
Oauth Token Stealing
Preface
The techniques presented in this paper are not necessarily new and were not initially discovered by myself. There is notable research that was done by FireEye and MDSec prior to this publication that sparked this report. The goal of this post is to build on their research, give a background of the techniques used, and present new tools for security teams to use as testing frameworks in the future.
In addition, this paper only covers OAuth abuse from the perspective of Microsoft accounts. This technique can be implemented on any service using similar OAuth protocols or permissions. Whether it be mobile apps, social media, personal email, or professional accounts, be sure to always review the permissions requested and the request source when granting third party access.
OAuth
What is OAuth?
OAuth is an open standard authorization protocol/framework that make it possible for applications, servers, and other unrelated services to have a way to have secure authenticated access. The protocol is designed to be able to do this without sharing any logon credentials (such as the user’s actual password). If you would like to learn more how the protocol works, check out this article.
OAuth was released in 2010 and has been expanded upon in OAuth 2.0, released in 2012. It has become a widely used authentication platform used by corporations such as Amazon, Facebook, and Microsoft.
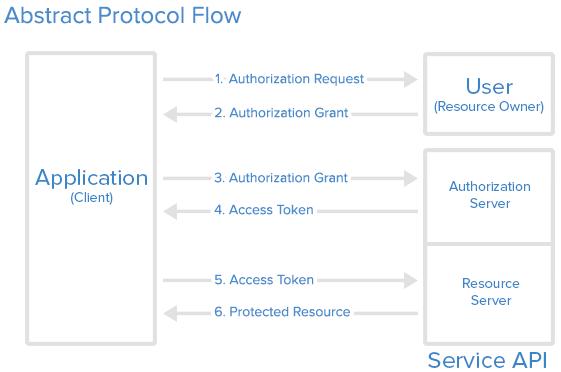
The general operational flow for this authentication is as follows:
- A user needs to authenticate to a website or service outside of their organization
- The resource forwards the user to a second authorization website on behalf of the user, where OAuth is used to provide the user’s identity
- If not already authenticated, the user may be asked to provide credentials
- The second site confirms the user’s identity and returns an access-token to the first website
- The first site uses this token to authenticate to the necessary services on behalf of the user
Below is a general diagram of the OAuth flow from Digital Ocean.
This is an oversimplified explanation, but you may use OAuth in your everyday workflow without even knowing. For example, let’s say you want to access your Office365 applications such as OneDrive, Office, and SharePoint. Here is the flow:
- You go to ‘Office.com’ and click the button to sign-in.
- You enter your corporate email address, and the site says, “Taking you to your organization’s sign-in page”
- You are forwarded to the corporate Okta (or other sign-in) page, where you input your domain credentials and two-factor authentication (if applicable)
- Once authenticated to your organization, you are redirected back to ‘Office.com’ and have all your applications available to you
- Behind the scenes, an access-token was given to Office365 to authenticate you, but your domain password was never exchanged
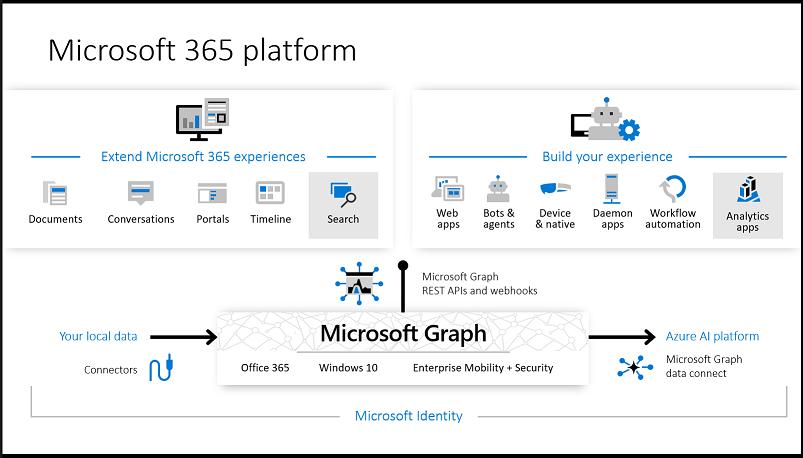
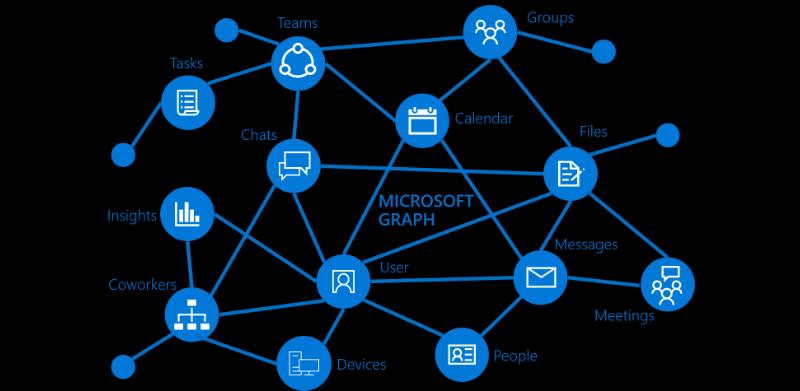
Microsoft Graph API
In many modern-day environments, Microsoft Office products are typically integrated to increase productivity, collaboration, and create deliverables. Some common examples are the Microsoft Office Suite (Word, Excel, PowerPoint, etc.) for projects, Outlook for email, SharePoint for sharing company resources, and OneDrive for cloud storage.
To further integrate these tools, Microsoft as introduced the Microsoft Graph API, which is a RESTful web API that enables users and applications to access these services through their request system. In order to use these tools, an access-token needs to be granted to the application, through the same OAuth protocols we discussed above.
These API calls can be used to perform many actions on behalf of the user including reading email, sending email, accessing files, reading user information, and much more. If there is an action you would like to perform on a Microsoft cloud product, there is likely an API call for that. For a full list of permissions that can be granted to an app, please visit the official Microsoft permission references documentation.
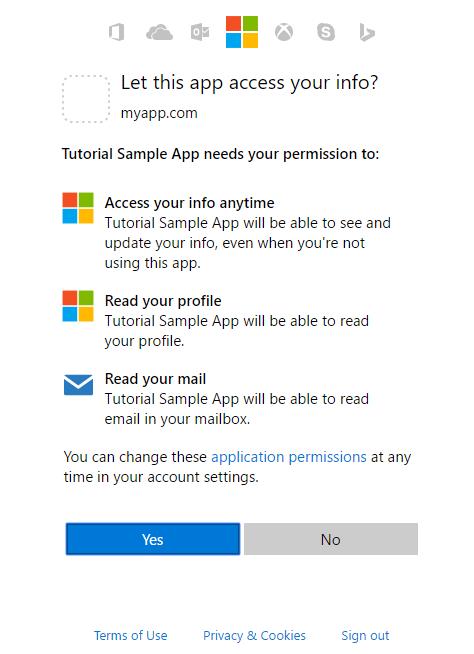
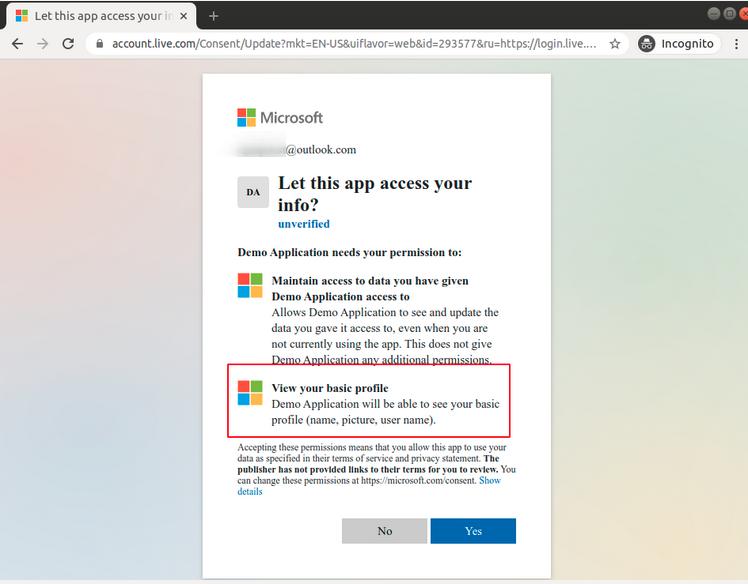
If you have ever seen a prompt such as the following, you have likely interreacted this service in some way, shape, or form.
Below are graphic from the Microsoft documentation with a visualization of the Graph API.
Room for Abuse
What are the Security Implications?
If you are reading this, you probably know that we are not here to discuss all the great, legitimate things these tools can be used for. Like most technology, if it can be used for good, it likely can be used for bad. So, if that is the case, what are the negative security implications of this technology?
On one hand, this method of authentication protects the user’s credential material. It also requires authorization from the user and, if configured, their organization. The issue arises when a rogue site or application requests these same access tokens and is given approval through methods such as phishing and social engineering, where security controls are not in place to block the authorization. We will be focusing on this scenario for the purposes of this paper.
Once granted permissions, the malicious service now has an access token that can act on behalf of the user for each service it has permissions to. One of the most interesting parts is that since no credential material is exchanged, the service will still have access after a password reset by the user. This also means this method can bypass multi-factor authentication. The access is only revoked if the token expires, or the permissions are explicitly revoked by either the user or the organization’s Office365/Azure administrator.
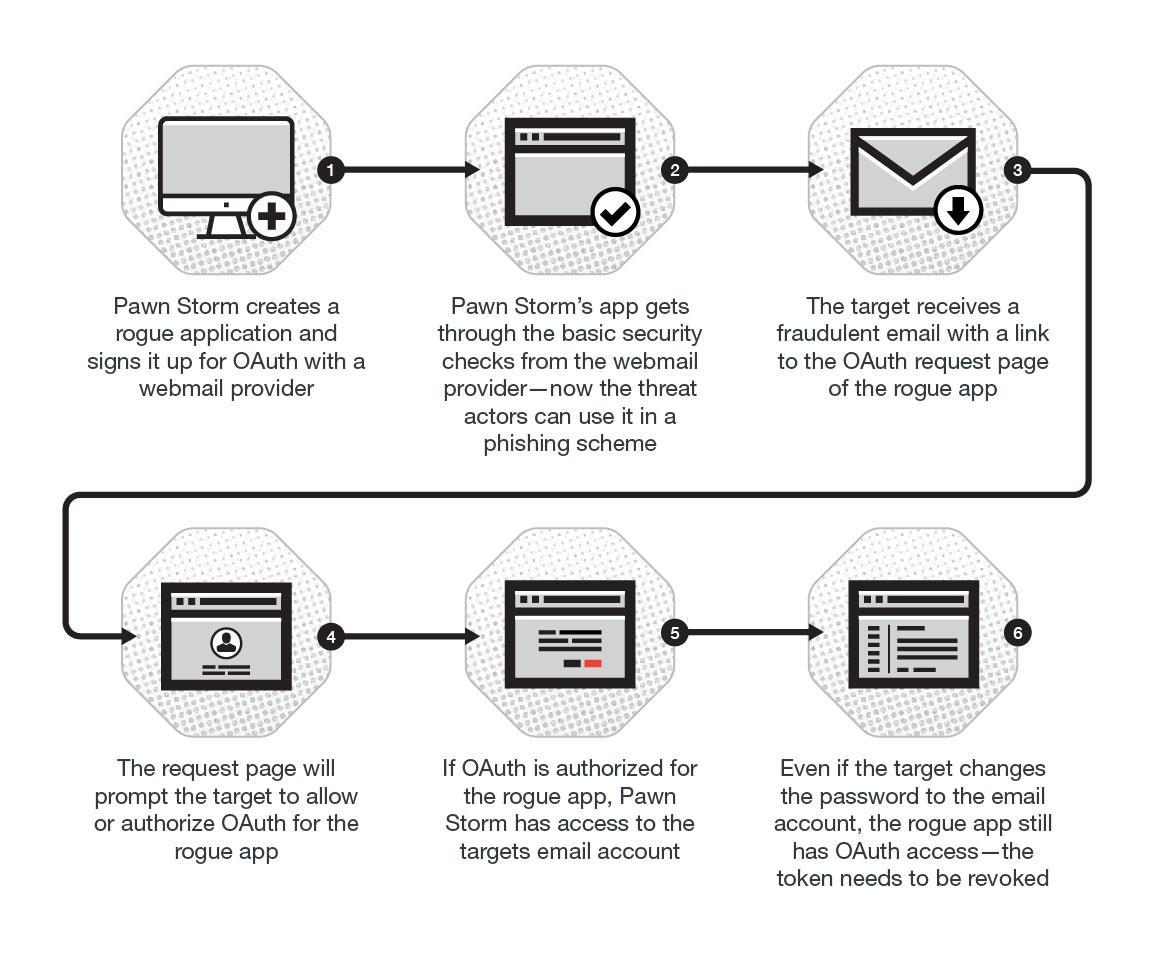
This technique was famously used in recent years by APT28 (most commonly known as Fancy Bear, Sofacy, and Pawn Storm). The group implemented OAuth phishing techniques within their 2016 campaigns against the German Christian Democratic Union (CDU), Turkish government, and arguably most famously (at least in the USA) the Democratic National Convention (DNC). Trend Micro has an excellent article on this topic.
Through these technologies, this Russian nation-state group was able to gain unauthorized access to emails, files, and other sensitive information.
Below is a graphic from Trend Micro’s article which illustrates the attack chain of the above campaign.
How do these Applications Work?
To gain an understanding of how these technologies can be abused, we will walk through how to create a proof of concept rogue application from a Red Team perspective. We will create a simple application using the Microsoft documentation.
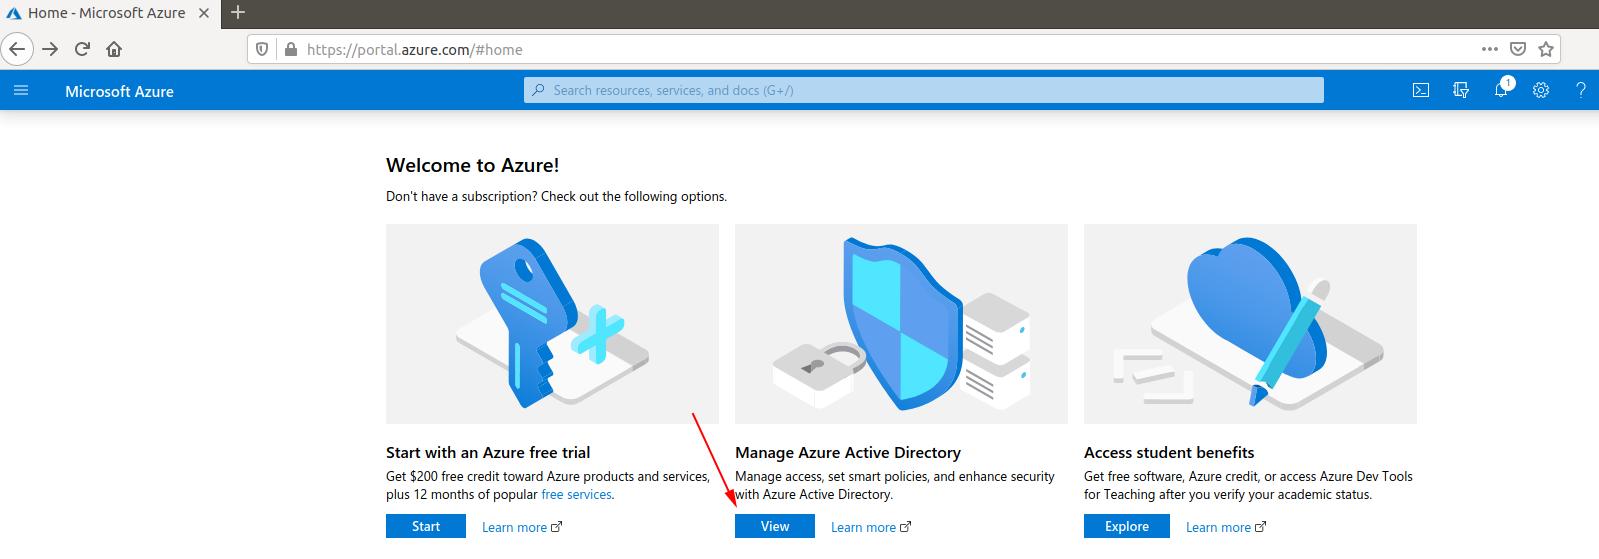
The first step is to head over to the Azure portal at https://portal.azure.com. Once you sign in with a Microsoft account, you should be presented with the home panel. To get to the application management page, we need to go to “Manage Azure Active Directory.”
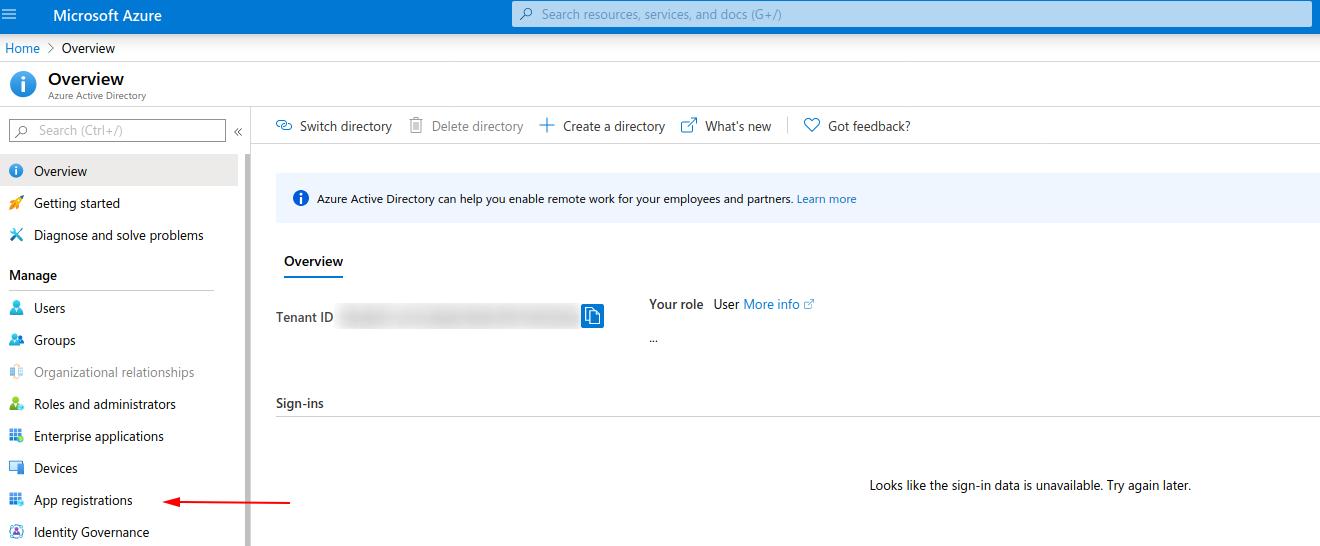
On the next page, you should see a panel that includes “App registrations.”
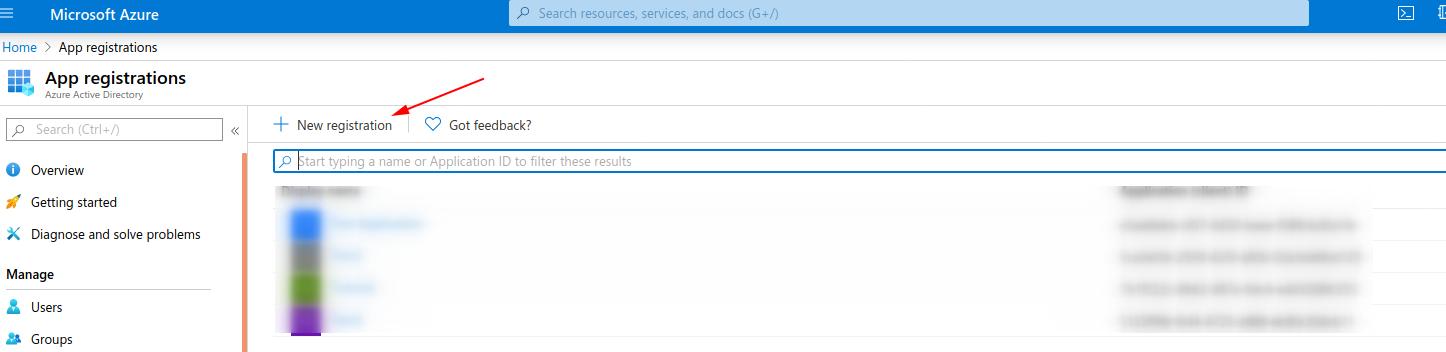
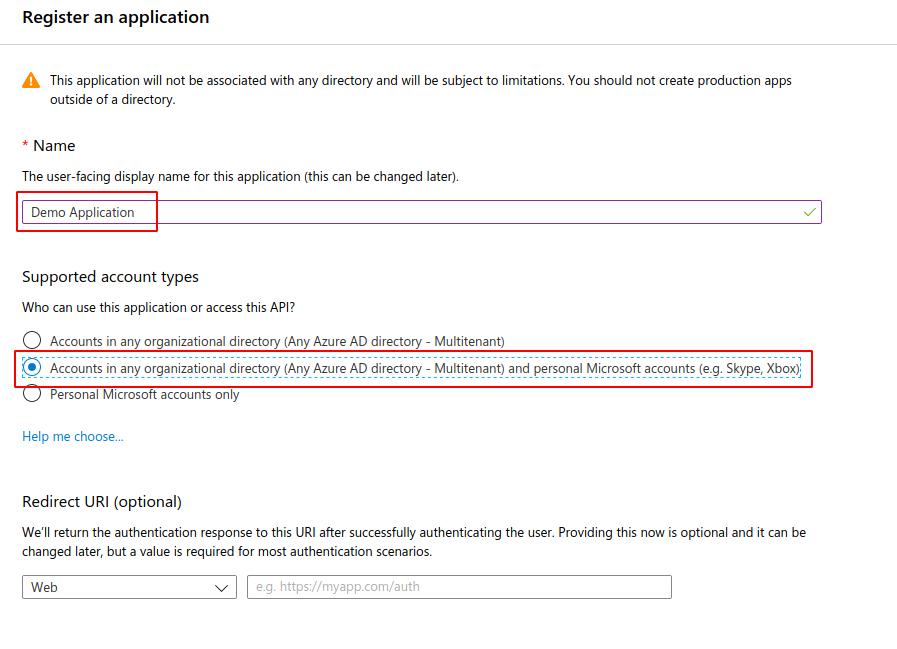
Now, go to “New Registration”
Give the application a name and set the supported account types to your choosing. For this demonstration, we chose accounts in any directory and personal Microsoft accounts to cover all target scenarios. We will set redirects later, so do not worry about this for now. Once complete, go ahead and click “Register”.
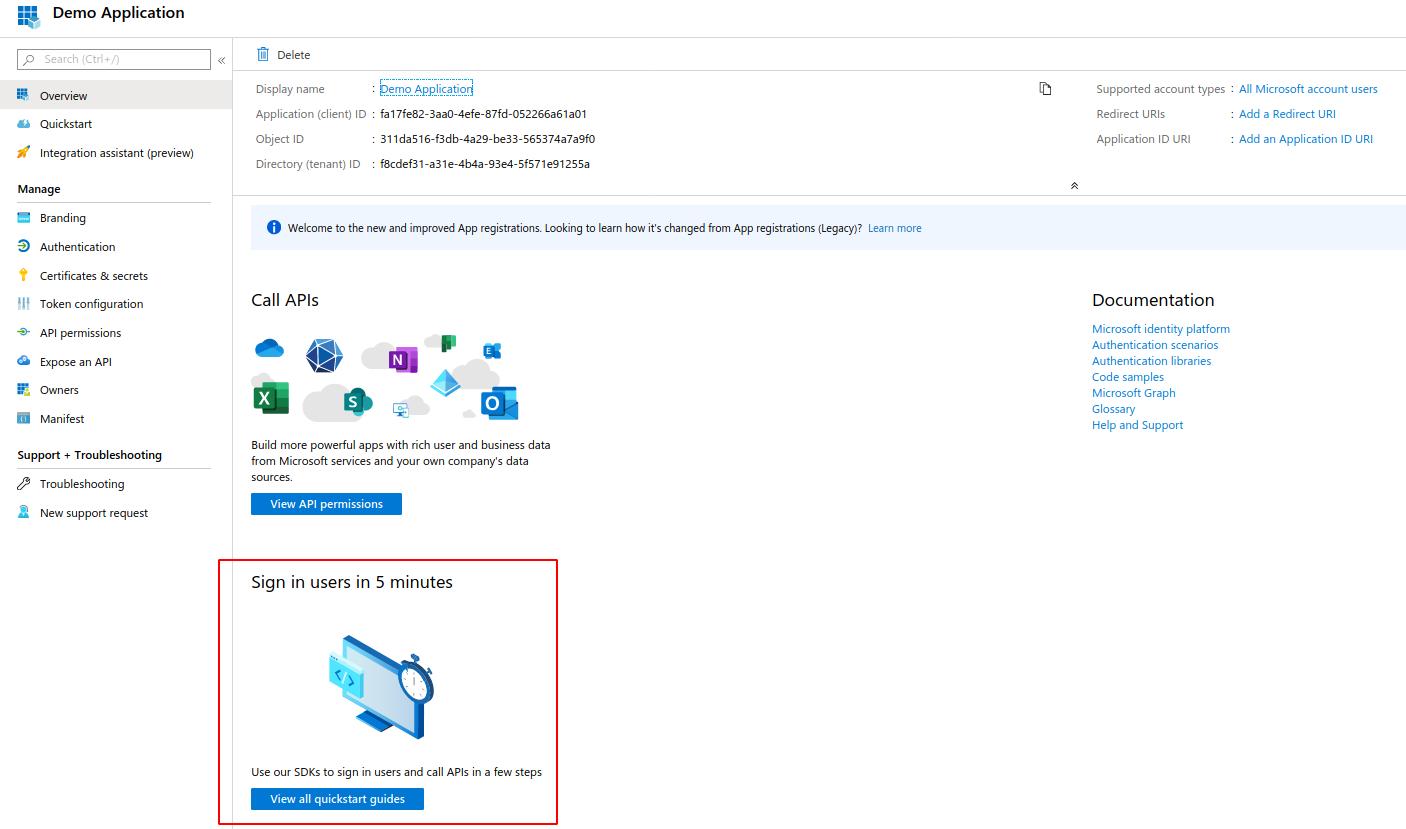
After the app is registered, we can see a quickstart guide. I found this to be a great resource in creating an application.
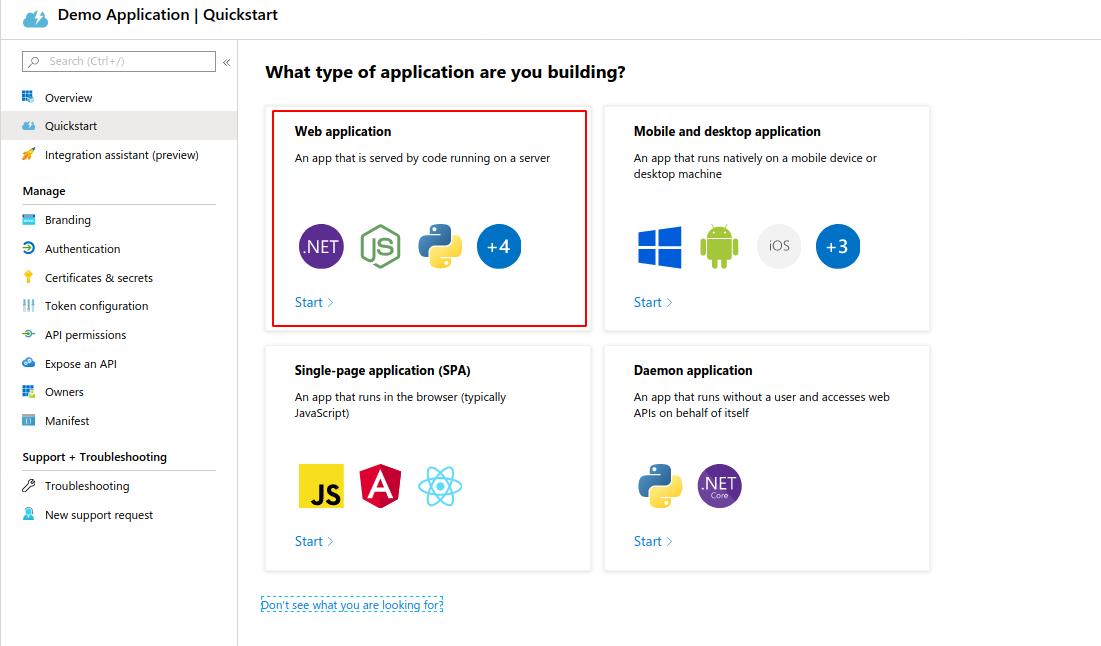
For this demonstration we will be using a web application.
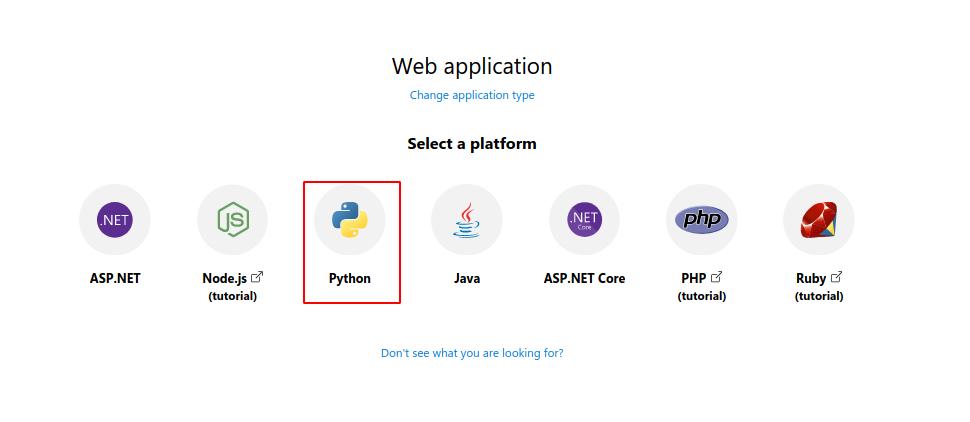
I prefer Python for creating my tools, so we will pick their Python option for this demonstration.
Here we will find sample code and instructions on how to get started with a simple python-based web application.
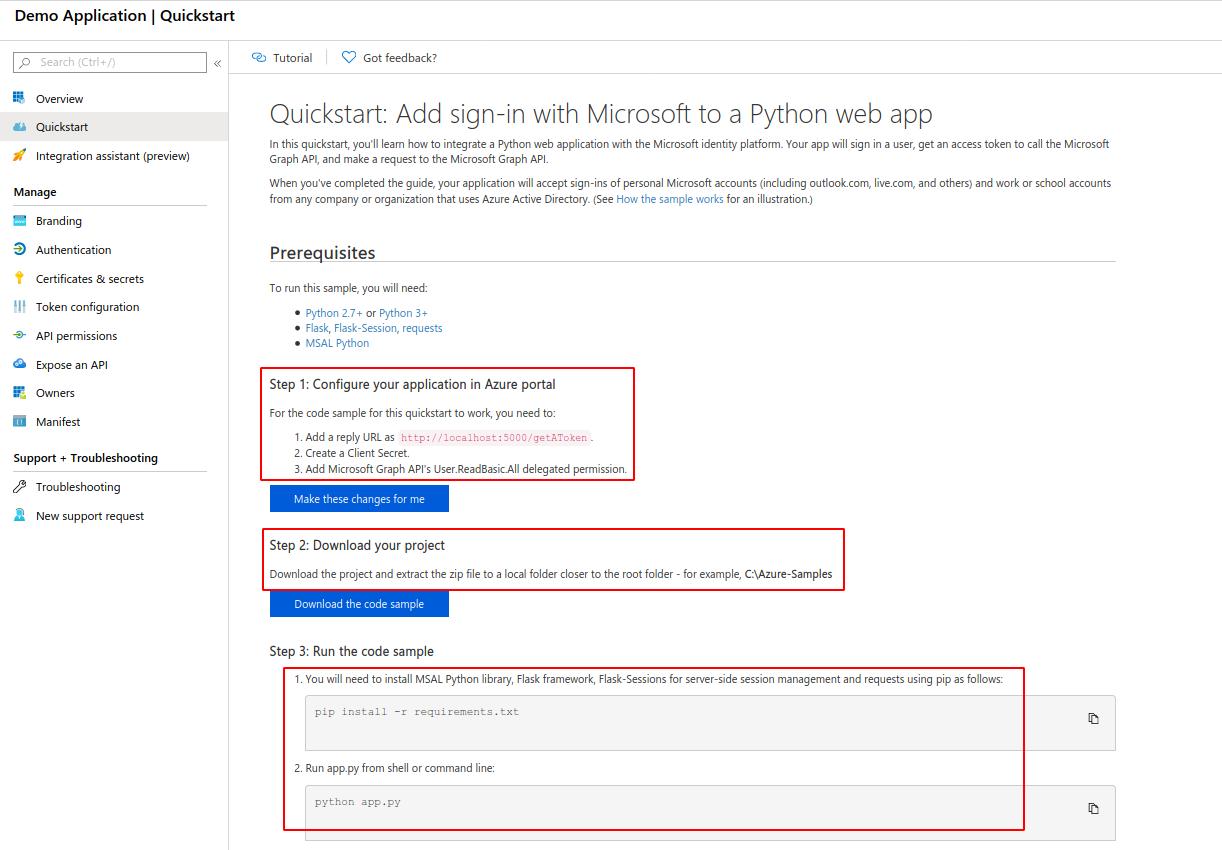
Creating an Application
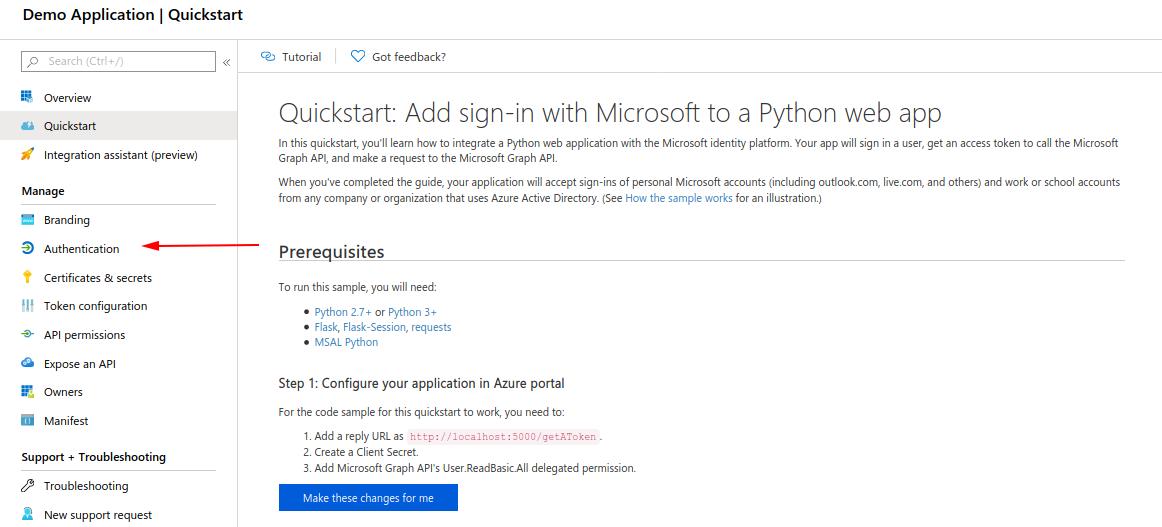
Step 1) Configure your application in Azure Portal
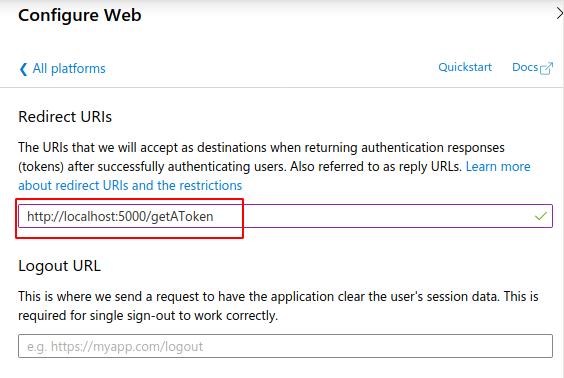
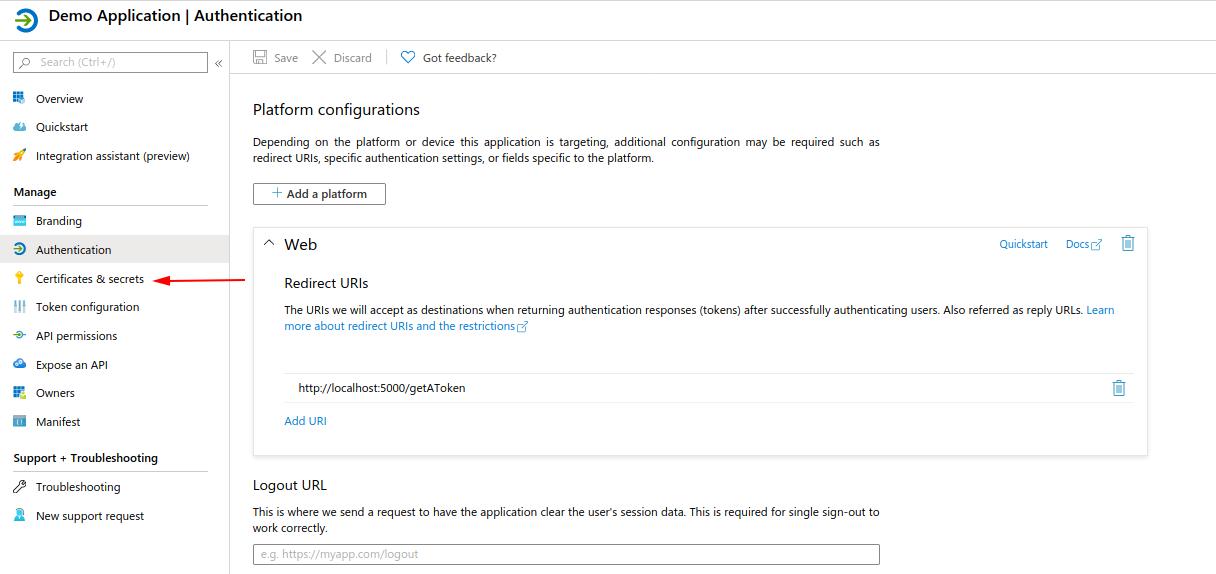
- Add a reply URL:
- Head over to the “Authentication” tab on our app panel
- Add a platform
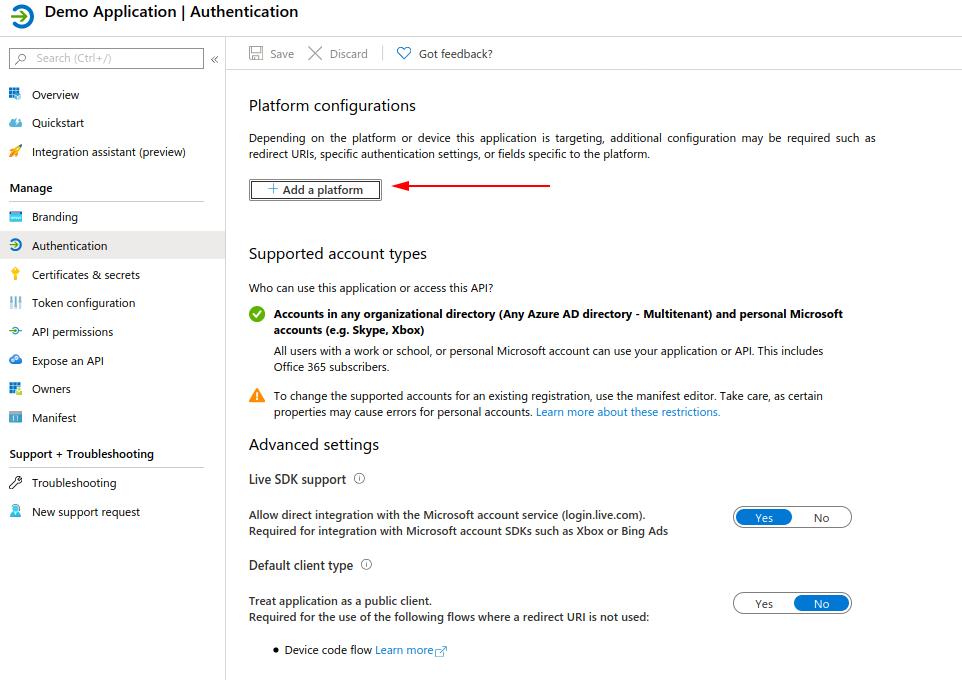
- Choose Web Application
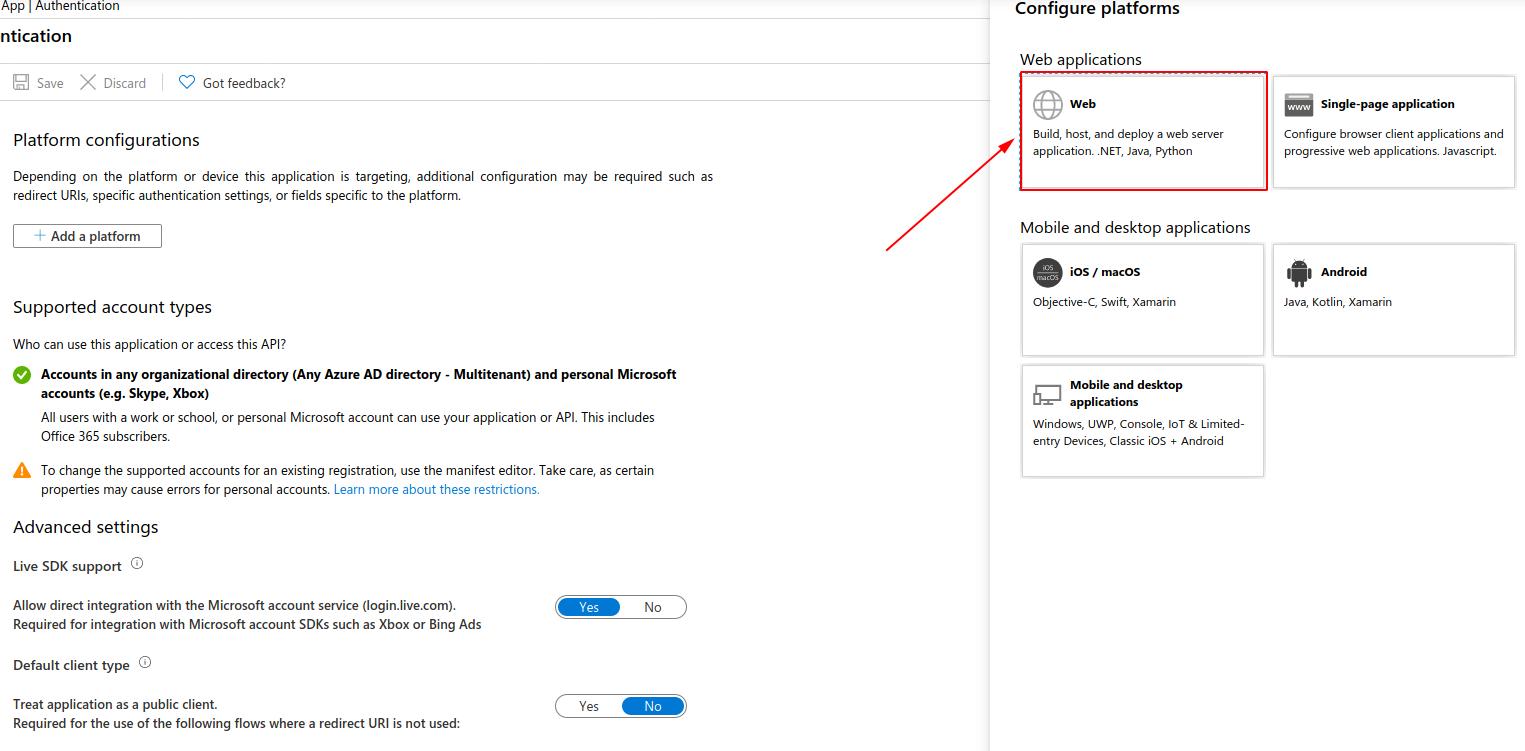
- Add the redirect URL (This can be any web server running your application)
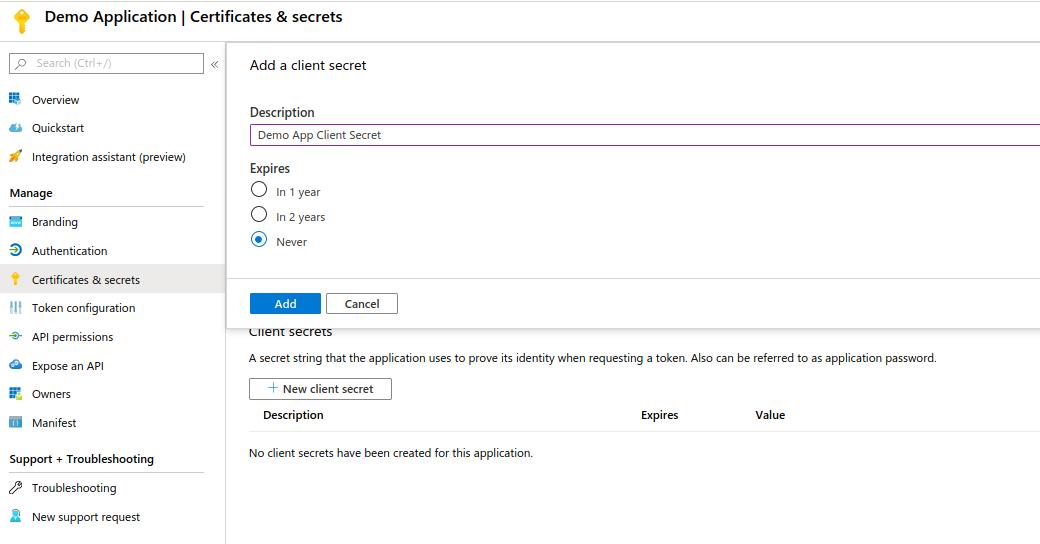
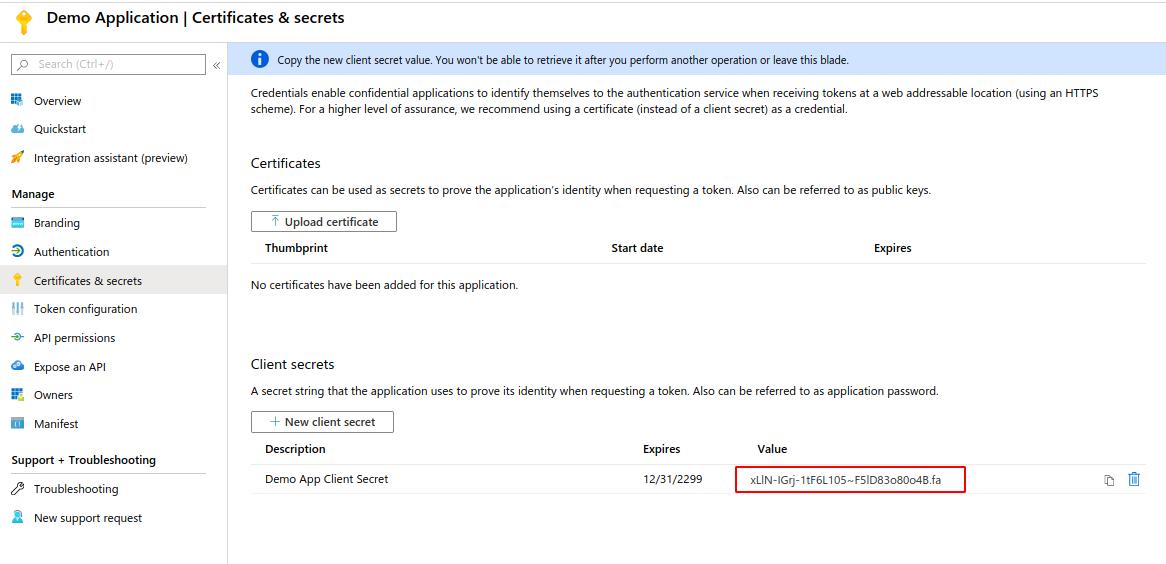
Step 2) Create a Client Secret
- Go to the “Certificates & secrets” panel. Create a new secret
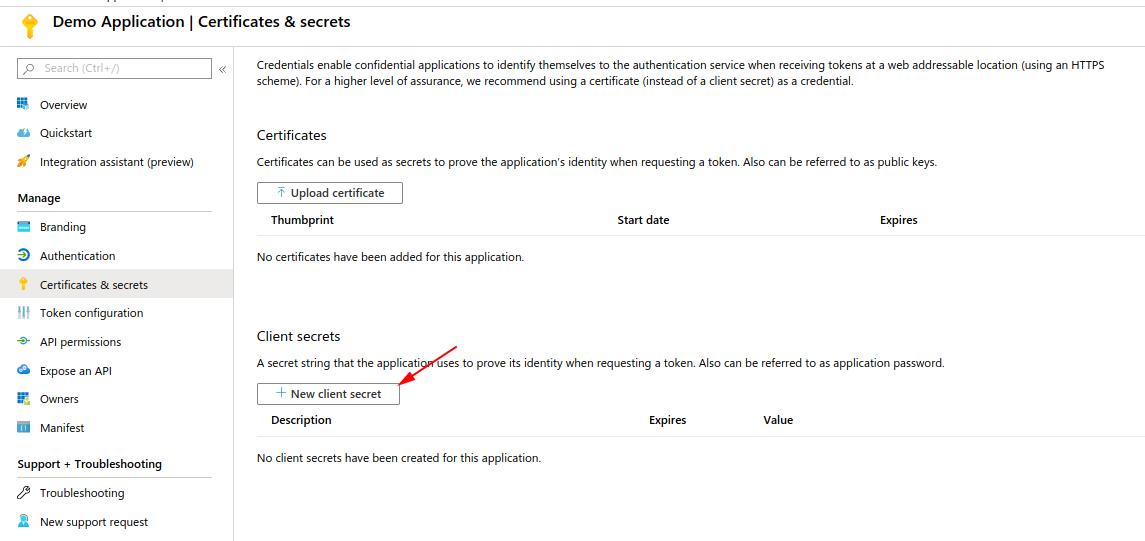
- Add a name and expiration. Once confirmed, you should have secret value
We now have everything we need to start creating our Python Application. Go ahead and download the code sample from the quickstart guide page and install requirements if you haven’t already.
There are two main programs we will be concerned with, ‘app.py’ and ‘app_config.py’. These are the backbone for our application.
To configure for use, we need to edit the app_config.py file with our client secret and client ID. These can be found on our application panel.
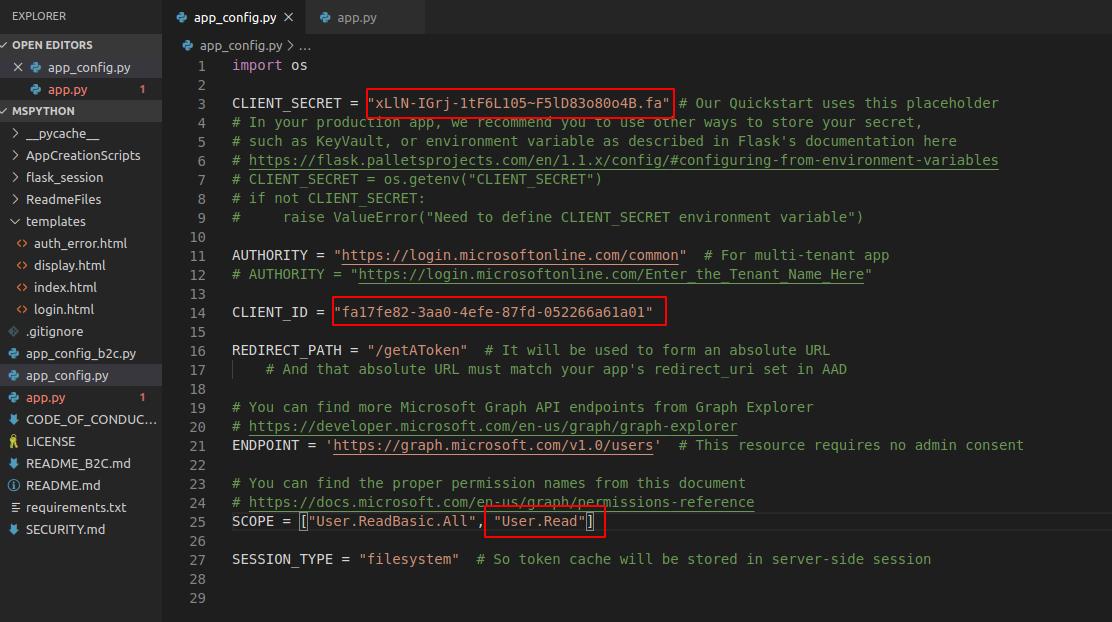
Notice the REDIRECT_PATH variable is the redirect URL we configured in our setup, if this were setup to a different path, we would need to change it here.
SCOPE is used to define the permissions needed. For the first demonstration, “User.ReadBasic.All’ will work with a work or school account. If you are using a personal account, add ‘User.Read.’
SCOPE will also need to be modified accordingly when adding more API calls as each requires a different permission set.
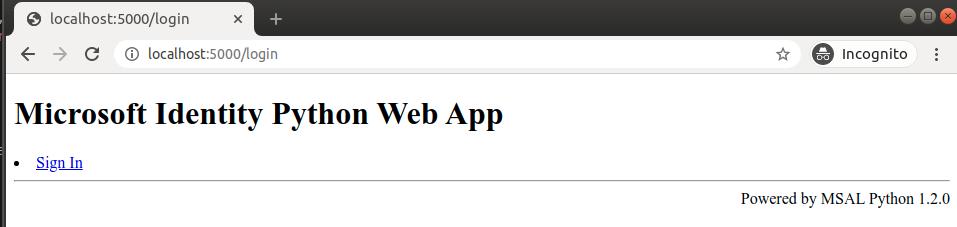
Now, with the configuration file set up, our application should be ready to test. Run the app.py program. This will create a web server using Flask. By default, it runs on localhost:5000, which is our redirect URL in the configuration.

In a browser, the application index page looks like the following:
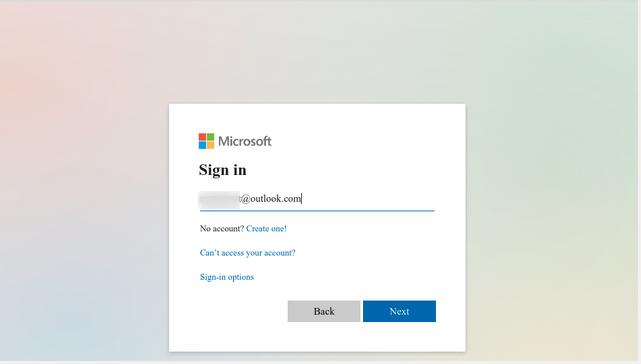
When we click on “Sign-in” we are redirected to Microsoft to authenticate with OAuth.
Once authenticated, Microsoft will ask the user if they want to allow this application to access their info, based on the permissions outlined in our SCOPE. As we only have the user read permissions, it is the only permission requested in the prompt.
Once accepted, we can see a request to our token page and the user is authenticated with the application. Behind the scenes, an access-token was returned to our web application.
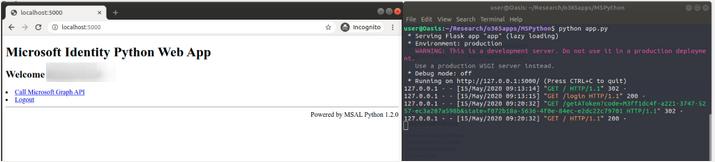
Microsoft has included a basic call to their Graph API in the demo, which we can see with “Call Microsoft Graph API” hyperlink.
When we go to this page, we can see a JSON response to the API call, displaying the user information.
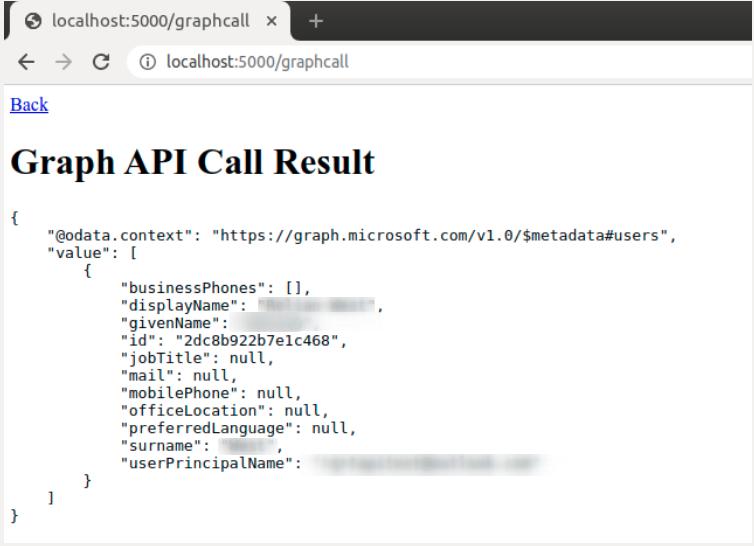
We have successfully called the Microsoft Graph API!
Breaking Down the Application API Calls
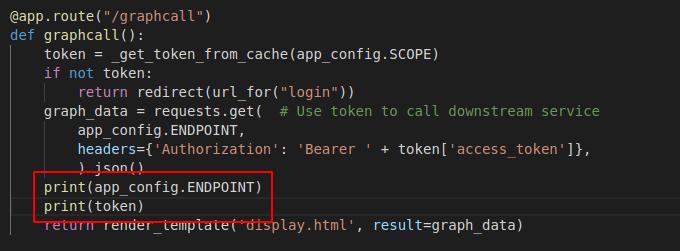
To make sure we know what is going on under the hood, let’s take a high-level look at the sample code that calls the API. I encourage you to review and understand the rest of the code, but we will not go over the whole program in this paper.
In the app.py code, we can see the API call in the /graphcall Flask route. This code contains the actual API call used on the page.
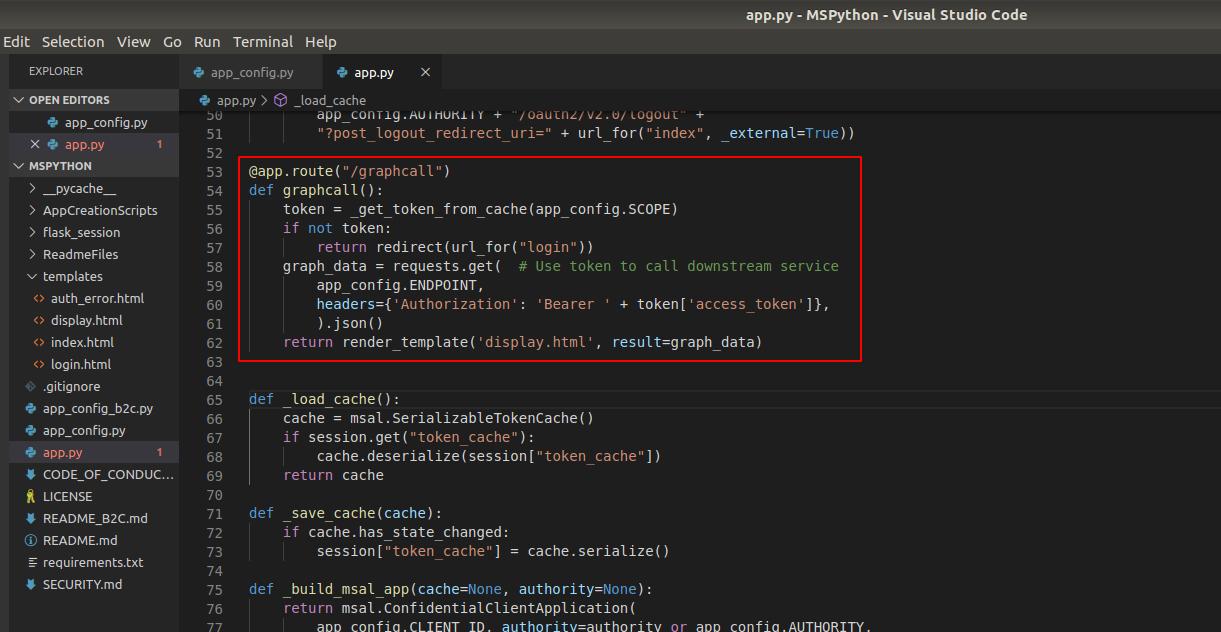
Here is the API call code:
graph_data = requests.get(app_config.ENDPOINT, headers={‘Authorization’: ‘Bearer ‘ + token[‘access_token’]},).json()
This is the heart of the application’s API. Let’s add some print statements to understand the actual request.
When we restart the web server and call the Graph API, we get the following output.
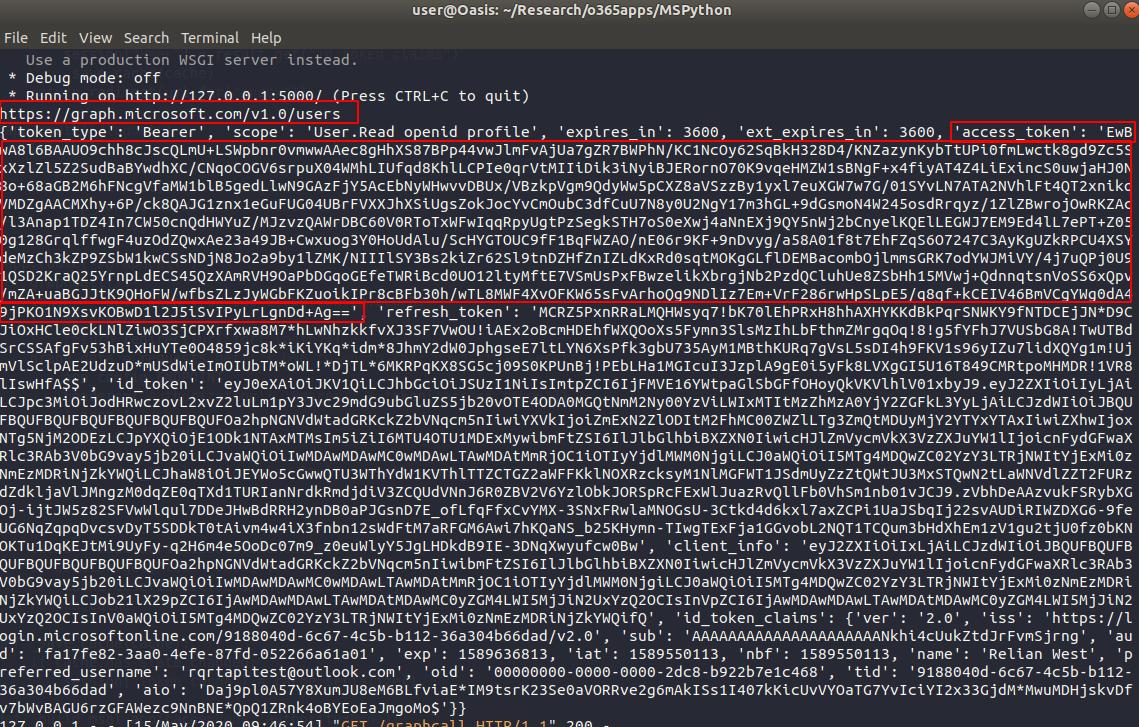
Breaking it down, the function is making an HTTP GET request to:
‘https://graph.microsoft.com/v1.0/users’ using the header: ”’Authorization’: ‘Bearer ‘ + UserAccesstoken”
According to the Microsoft Graph API documentation for “Get a user”, this is the exact API call you need to make to get the user information.
The token you see is what is passed to the application from Microsoft when the user authenticates with OAuth, along with some other parameters. The most important being the access-token, and the refresh-token. By default, the access-token has a lifespan of one hour and needs to be refreshed by calling the API with the refresh-token. By default, the refresh token is valid for 14 days.
With this token, the application has full access to any resources the user allowed in the permission prompt. With this token, we can create our own requests to the API and access resources such as emails, files, and shared sites.
For documentation on the different types of functionality and parameters, please visit the Microsoft Graph REST API v1.0 Reference.
Tools for Red Teams
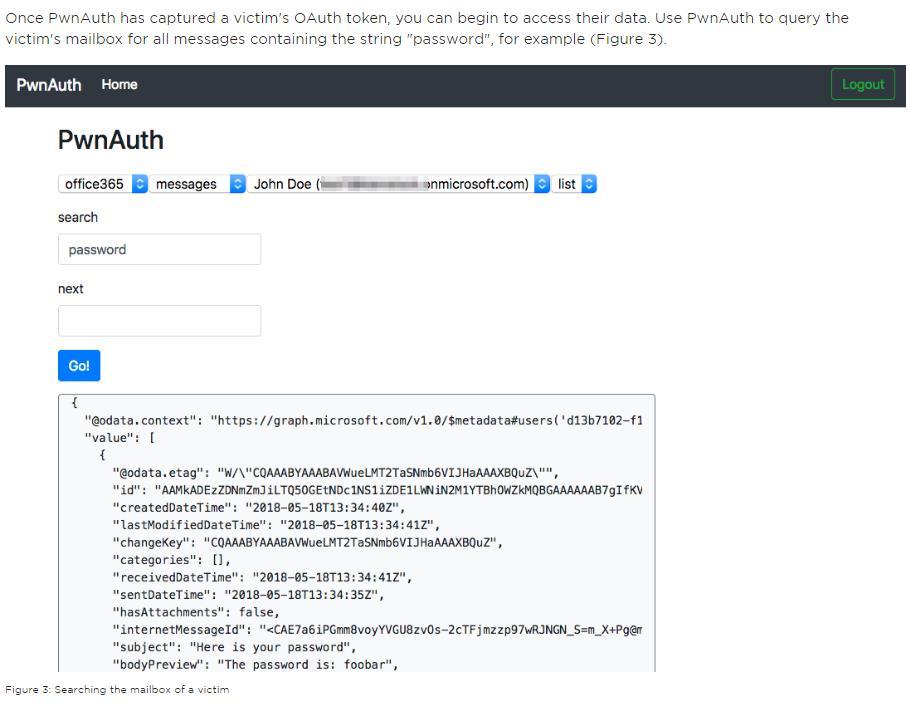
PwnAuth
For red teamers and security researchers, there are already existing frameworks that can be used to test this activity. The first tool goes by the name ‘PwnAuth’ and was published in May of 2018 by FireEye. This tool uses a combination of Nginx, Django, and Docker to create an interactive web console for security researchers to test the techniques mentioned above.
This tool currently has the following functionality:
- Reading mail messages
- Searching the user’s mailbox
- Reading the user’s contacts
- Downloading messages and attachments
- Searching OneDrive and downloading files
- Sending messages on behalf of the user
Below is a quick snippet from their website of their web GUI:
Office 365 Attack Toolkit
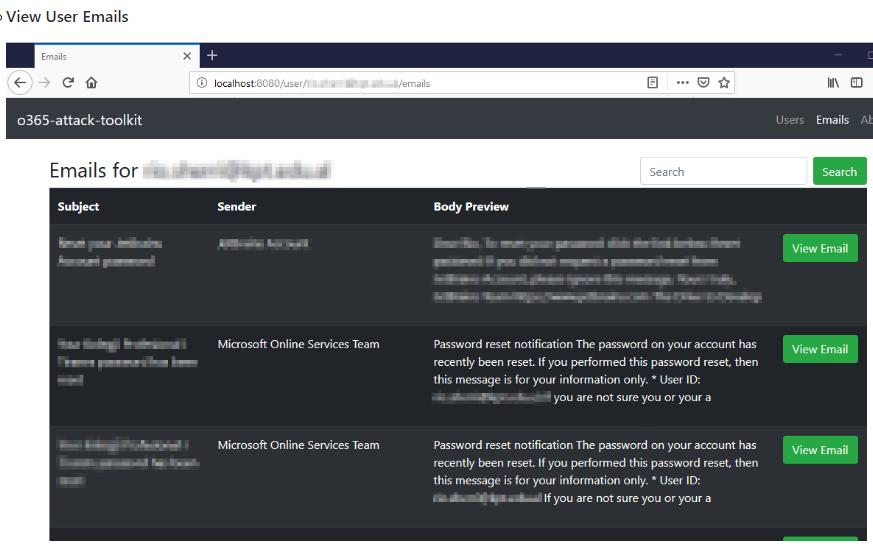
Another tool worth mentioning is the Office 365 Attack Toolkit, published by MDSec in July 2019. This tool uses a web framework written in Go with an SQLite database backend to create a similar web interface for security researchers to test their environments against OAuth token stealing with malicious applications.
This tool currently has the following functionality:
- Extraction of keyworded e-mails from Outlook.
- Creation of Outlook Rules.
- Extraction of files from OneDrive/Sharepoint.
- Injection of macros on Word documents.
Below is a quick snippet from their GitHub documentation:
PynAuth
While the above tools are very useful and well put together, I had some learning curve when attempting to configure them properly. My tools of preference are those which I can quickly setup and takedown and can be quickly modified as needed, with little overhead.
As part of this research, I created a Python-based framework called PynAuth which is a tool that utilizes the same techniques as the above tools. The difference is that it is written completely in Python. It is designed to be modular, and can be run right your terminal. The tool is meant to be easy to use and easily customizable depending on which API calls you wish to implement.
The tool’s name is a play on the PwnAuth tool name written by FireEye. *Please note, while this tool is functional, it may contain bugs and is currently in a beta stage
Current capabilities:
- Get user information
- Send email on behalf of the user
- Query users’ email inbox for keywords, display message, and download attachments
- Access users’ OneDrive folders and download files as desired
- Create email inbox rules
- List/Delete email inbox rules
- Refresh the users’ tokens, which allow for access up to 14 days
Terminal View:

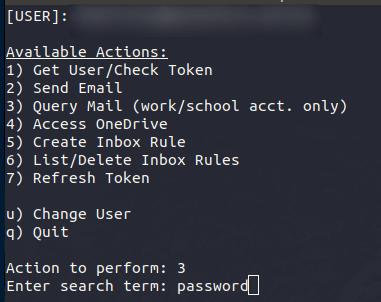
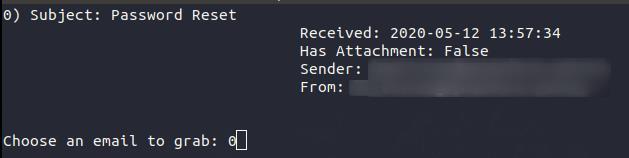
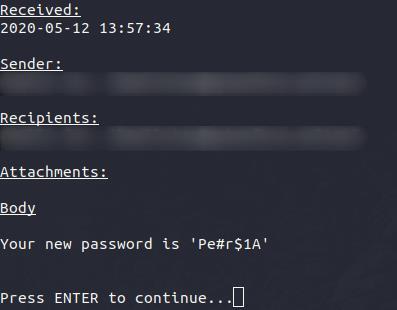
Example: Query Email
Defending Against OAuth Application Attacks
While these techniques may provide a stealthy means to keep persistence in a target network, there are many measures that can be taken to prevent these attacks before they happen. Blocks for these applications will typically require proper configuration, as by default, no admin permission is needed for most resources the user already has permission to. These include things like read/write permissions to personal email and accessing both personal and corporate cloud storage resources.
Some security measures that can be implemented include:
- Limiting the permissions that can be requested by third-party applications
- Banning third-party applications altogether
- Creating application white lists to include only those in use by your organization
- Query your organization’s users and the applications they have granted permissions to
- Logging user consent events within your cloud environment
FireEye has even published a PowerShell script which can help administrators hunt for malicious applications within their cloud environments. The tool can be found on GitHub.
If you are an end user, be sure to always review third party permissions before granting access to your accounts, whether personal or professional. When in doubt, confirm with your administrator whether the application is legitimate or not.