SSL/TLS Tunneling to Bypass Filters & Avoid Detection
In certain environments, controls such as firewalls are in place that restrict outbound ports and protocols. For example, maybe only web traffic over ports 80 (HTTP) and 443 (HTTPS) are allowed outbound from a given workstation.
In campaigns I have performed, I have had scenarios where we needed to control a device remotely (such as a raspberry pi) where direct terminal access would be ideal (such as SSH). But this requires an established external connection, where there are a few issues to consider:
- Outbound SSH over port 22 may be blocked
- Outbound SSH traffic over a non-standard port (22) may be blocked
- Even if neither of the above is blocked, anomalous outbound SSH traffic on any port is suspicious and may trigger alerts and/or attract unwanted attention from a threat hunter or analyst
What is a solution to this? Tunneling!
As an attacker we always want to make any inbound/outbound traffic look as normal as possible to ensure the operational security of our campaign. As the most common outbound traffic is likely web traffic, lets emulate this. There are a few tools we can use to make this happen. Best part is they are free and open source.
Socat
The first step in emulating web traffic, is making our communication speak the same protocol as the normal traffic. HTTPS traffic (encrypted HTTP) uses SSL/TLS (Secure Socket Layer/ Transport Layer Security) encryption to ensure that all communication between the web browser and the web server are safe from a third party seeing what is being transferred. Any website where you see the lock icon next to the URL is using such encryption to protect your data. TLS is the preferred method, as TLS is an updated more secure version of SSL.
How does this benefit an attacker? Since these protocols encrypt the traffic within them, if we can use SSL/TLS to encapsulate SSH traffic, the SSH traffic would be shielded from detection (unless there is a security device in the middle that can decrypt the SSL/TLS traffic).
This is where Socat comes into play. Socat is a tool that is used to transfer data between two addresses using a desired protocol. Since we want to communicate with our C2 server using TLS, we can create this transfer pipe using OpenSSL. For our demonstration, we will use our ‘pc-tech.pro’ domain for C2 (Ubuntu server hosted in Amazon AWS).
1) Install Socat on implanted/rogue device (Sudo apt install socat)
2) Modify our SSH config file for our user to use ProxyCommand to establish a tunnel using OpenSSL to our C2 domain using port 443.
What this configuration does, is that for any SSH connection to ‘pc-tech.pro’ socat will be used to create a TLS tunnel using the site’s certificates for the SSH traffic to be encapsulated in.
Stunnel
Now that we have a means of encapsulating SSH traffic to our C2 server, we need something to receive and decrypt the traffic. For this, we will use the tool Stunnel. In short, Stunnel is a tool designed to add TLS encryption to applications that do not speak the protocols natively. In our case, it will be used to host the TLS certificates used for our encapsulation, decode incoming traffic, and forward the traffic to another port.
1) The first step in our configuration is to install the software on the C2 server: (Sudo apt install stunnel4)

2) Set up the configuration file (/etc/stunnel/stunnel.conf): *This will need to be created as it does not exist by default*
Breaking this down by line:
- Set pid for the process
- Add TLS certificate
- Add TLS key
- Define rules for specified traffic type (SSH for us)
- Listen on all interfaces on port 443 (HTTPS)
- Forward & decrypt all incoming SSH traffic to port 443 to a port of your choice (2222 for us)
For our TLS certificates, we used Let’s Encrypt certificates that can be used for webpages. Setting these up are outside the scope of this paper, but you can read more about this on their website.
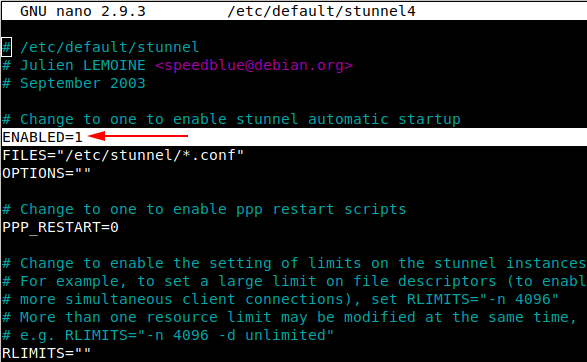
3) Enable Stunnel in config (/etc/default/stunnel4):
*By default, the service is not enabled. To enable it change “Enabled=0” to “Enabled=1”*
4) Start service: (Sudo service stunnel start)
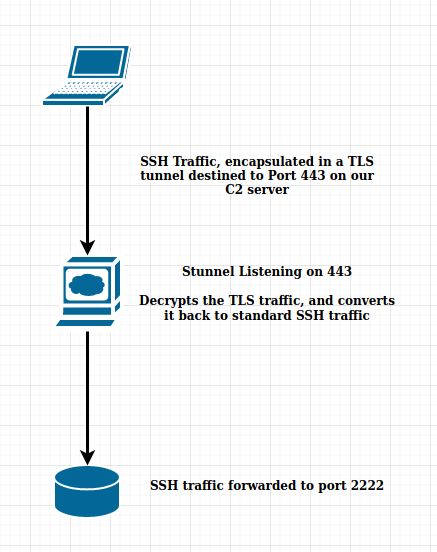
The following diagram is a visual of the steps we have taken so far:
You may be asking, “Why are we forwarding traffic to port 2222 instead of standard SSH (port 22)?”
This is because we are going to be hosting 3 services off this one port. SSH, HTTP, and HTTPS. This way, if we visit port 443 with a web browser, it will display a webpage to the user, while if we hit port 443 with SSH traffic, it will establish an SSH tunnel. This is done to avoid detection from an analyst and/or sandbox.This is where we get into our final tool, SSLH.
SSLH
SSLH is a “SSL/SSH Multiplexer” that acts like a switchboard for protocols it receives. It can be configured with any protocol that can be recognized with regular expressions. Simply put, depending on what traffic it receives, it will forward the traffic to a different port, based on the protocol. For our example, the following routes will be created.
- If SSLH receives SSH traffic, forward to port 22
- If SSLH receives HTTP traffic, forward to port 8080
- If SSLH receives HTTPS traffic, forward to port 8443
To configure our server to use this tool, we will take the following steps:
1) Install the tool on our C2 server: (Sudo apt install sslh)

2) Edit the configuration file in /etc/default/sslh:
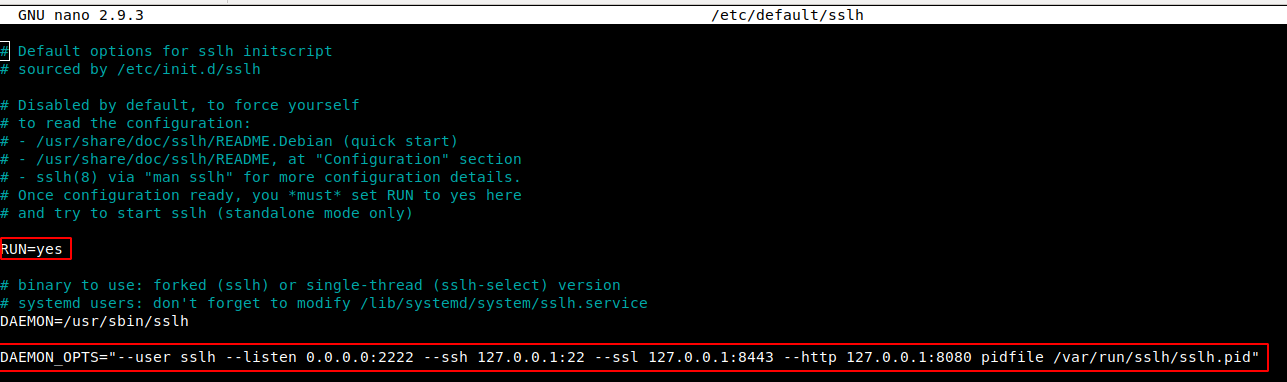
Breaking this down:
- Ensure “RUN” is set to “yes”
- Set “—listen” to the port we are forwarding Stunnel traffic to (port 2222). This is the port SSLH will be running on
- For SSH traffic, forward to localhost, port 22
- For SSL/TLS traffic, forward to localhost, port 8443
- For HTTP traffic, forward to localhost, port 8080
3) Start the service: (Sudo service sslh start)
Now the only thing we need to do to complete our tunneling infrastructure is to set up our SSH and web services.
Configuring Web Service and SSH
To serve web content to browsers, we will use an Apache web service on our C2 server (although any webserver will do).
1) In your desired web server port configuration, point HTTP and HTTPS to the ports configured in SSLH.

2) Start Web Server
For SSH, we will use the standard SSH service (Sudo service ssh start)
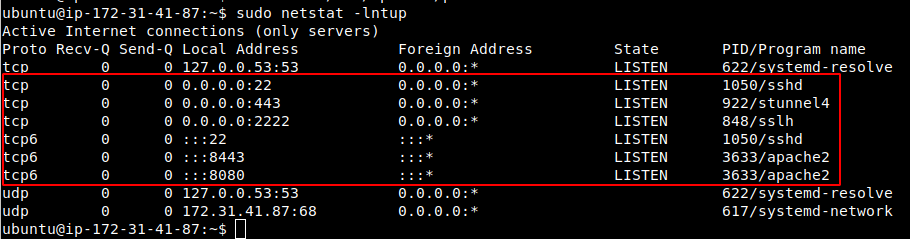
Now, if everything worked correctly, we should see all our ports listening accordingly:
Testing the Configuration
The following diagram is a visual of what the final configuration should look like. All return traffic in will be encapsulated in the TLS tunnel as well.
Web Traffic
When visiting the site in a browser, we see a normal looking website that can host any content we desire:
Wireshark Capture:
SSH Traffic
When we SSH to port 443 of the server, the socat OpenSSL tunnel is created, and we can SSH over the same port our web traffic hit above (the -p443 is not needed as it is in our socat config, just used to explicitly show the port we are connecting to):
In both cases, the traffic looks like TLS encrypted web traffic.
Optimizing for Offensive Operations
Now that we have proven we can tunnel SSH traffic over TLS, we need to be able to access our implanted device at any time, from anywhere. To take it one step further, we will set up a reverse SSH tunnel to our C2 server, which we can access from our own device.
Host “Oasis” will simulate our rogue device. We will set up a reverse tunnel to our C2 server using SSH.
What the below command does, is open port 7777 on our C2 server to tunnel all traffic destined to port 7777 to the SSH port on the rogue device. All of this is encapsulated in our TLS tunnel.

Looking at the listening ports on our C2 server, we can see that this port is in-fact listening.
Now from our attacking machine, we can SSH to our C2 server, then SSH to our rogue device.
The following is a diagram of what this traffic looks like, using the C2 server as a jump box into the target environment. This allows us to have terminal access to the host, while masquerading as HTTPS traffic to a normal website.